Friday, February 15, 2013

Simple Valentine's Day Card

Yes, The Hubs did get a Valentine card from me. 

And on time. 

Go me!!

The previous cards I have posted were for a friend to give to her daughters. I had fun being crafty outside my box. You know, girly paper, fussy cutting, ribbon....

(I will post two more Valentine cards this weekend

(look at me....just posting away, LOL)

Now back to the card for My Valentine

Back to simple and easy. 


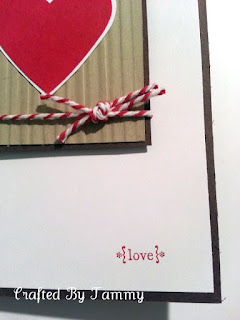
Chocolate Chip is one of my favorite colors! 


Just a little Love goes along way.
I love him so very much. :)


And Crumb Cake! It goes with everything!!! 

I like how the crimping helps 
the heart "Pop" just a little more.


(When you add a bright color with Crumb Cake, it just "POPS" doesn't it??)


I was asked once what my fav SU color was. I was like "really??". How can you ask me to choose??!! 
I have a lot of favorite colors. I can't pick just one! 

Can you??


Stampin UP! Supplies
Cardstock - Crumb Cake, Real Red, Chocolate Chip
Large Heart Punch
Stamps - Tiny Tags
Ink - Real Red
Craft Store Supplies
Cardstock - white
twine


Wednesday, February 13, 2013

Valentine Card

Using up more of my stash of this beautiful DSP, Attic Boutique.


See what I did here? I cut out some of the larger flowers from the paper. Layered and glued them onto white cardstock. 
Then cut around the edges. 
And then did it again with light blue cardstock.

I know, I should have taken pics. Sorry. 


Ribbon. Cutting. Layering. 
Fun elements and techniques make for a pretty card.


And no ink on this one either!!  The one I posted yesterday didn't have ink on it either.


Stampin UP! Supplies
DSP - Attic Boutique
Craft Store Supplies
Cardstock - white, light blue
ribbon


Tuesday, February 12, 2013

Cards for Valentine's Day


Valentine's Day is upon us. Will I get The Hubs a card made in time? We shall see! :)


I will start today by announcing that I don't like Pink. 
We just don't get along. 

Not Pink the artist/singer, but Pink the color.  

I just can't seem to make it work.

I have tried!!


I think this is only my second pink card. 

Ever.


I really like this patterned paper. And have been hoarding the pack for a while. Waiting for just the right card/project to use it on. 

What do you think??


I'm not happy with the bow. But that's the only pink ribbon I have.

Remember?? 
Pink and I don't get along so I kind of avoid it at all costs. :)


Stampin UP! Supplies
Cardstock -Very Vanilla, Crumb Cake
DSP - Attic Boutique
ribbon
Finial Press embossing folder
Craft Store Supplies
Cardstock - pink
brads

Friday, January 18, 2013

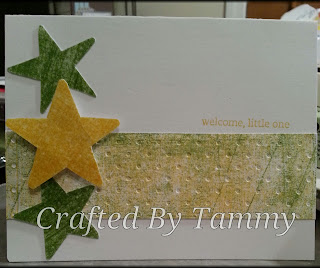
Gender Neutral Baby Card

I have not used the Glassy Glaze from Stampin UP yet. I kinda' forgot about to tell you the truth. It has been discontinued so I will have to find a replacement when this jar is gone. 

I was asked to make a gender neutral baby card. 

Yellow and green colors came to mind. So I assembled my supplies and got to work.


I opened the ink pad and pressed it onto the white cardstock. If you look closely you can see the texture of the pad.  Then I pressed the VersaMark pad over the inked cardstock. I sprinkled the Glassy Glaze on the cardstock over the VersaMark, then used the heat gun to melt the powder.  I stamped a star onto the back of the glazed cardstock.  Then fussy cut it out. 


I had already done the same procedure for the Pear Pizzazz. You can see it in the background.

I like the effect of mixing the two colors. I used the opened ink pads on the cardstock, overlapping the colors. You can see the lines from the edge of the Pear Pizzazz pad.

I used the Perfect Polka Dots embossing folder on a strip of white cardstock. Turned it over so that the indention of the dots is what shows. I stepped outside the box on this one, normally you would want the raised dots to show.

Here is the finished gender neutral baby card.


Stampin UP! Supplies
Ink - Daffocil Delight, Pear Pizzazz
Extras - Glassy Glaze emboss powder, VersaMark
Craft Store Supplies
Cardstock - white

Sunday, December 9, 2012

Mod Podged Cell Phone Case

My contract was up with our cell phone carrier, so The Hubs decided he wanted me to have a new phone. 

Guess which one I decided on?

The Samsung Galaxy SIII. 

We got lucky and got this for a good price. I just couldn't pass it up!

Ain't she pretty??
 (Samsung Galaxy S3 in Pearl Blue)


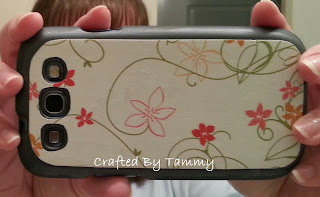
She (should I name her? LOL) is so pretty, I hate to put a case on her and cover up all this shiny-ness. But we all know, we need our phones in cases just in case we drop them. Right? So I decided to pretty-up my ugly, grey case.  With the help of some Mod Podge. (this stuff is awesome!)


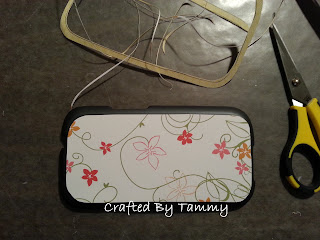
I assembled all of my supplies....


and got to work.....


....tracing, trimming, and trimming some more until I got the paper just the right size.  

Then I used a foam brush to spread some Mod Podge Hard Coat on the case. Then a little on the paper. Laid the paper on the case, and spread all the bubbles and creases out the best I could.


I set it to the side to dry, rinsed the brush and started another load of laundry. (always laundry to do, huh?)  I came back and spread some more MP over the paper.  Then set it aside to dry. Again. 

Don't forget to rinse your brush!! 

I probably put 4 coats of MP on the paper. 

 If you have worked with MP, then you know you have to let the object you are MP-ing dry in between coats.  At least 15-20 minutes. I am an inpatient person, so this is hard for me. But, well worth it in the end!!


See, she is still pretty, just in a different, not shiny way. :) 

Note: if you look closely at the top of the paper, you can see the MP on the case. I just scraped it off with my fingernail. Not all at once. Over the space of a couple of days.