Sunday, December 9, 2012

Mod Podged Cell Phone Case

My contract was up with our cell phone carrier, so The Hubs decided he wanted me to have a new phone. 

Guess which one I decided on?

The Samsung Galaxy SIII. 

We got lucky and got this for a good price. I just couldn't pass it up!

Ain't she pretty??
 (Samsung Galaxy S3 in Pearl Blue)


She (should I name her? LOL) is so pretty, I hate to put a case on her and cover up all this shiny-ness. But we all know, we need our phones in cases just in case we drop them. Right? So I decided to pretty-up my ugly, grey case.  With the help of some Mod Podge. (this stuff is awesome!)


I assembled all of my supplies....


and got to work.....


....tracing, trimming, and trimming some more until I got the paper just the right size.  

Then I used a foam brush to spread some Mod Podge Hard Coat on the case. Then a little on the paper. Laid the paper on the case, and spread all the bubbles and creases out the best I could.


I set it to the side to dry, rinsed the brush and started another load of laundry. (always laundry to do, huh?)  I came back and spread some more MP over the paper.  Then set it aside to dry. Again. 

Don't forget to rinse your brush!! 

I probably put 4 coats of MP on the paper. 

 If you have worked with MP, then you know you have to let the object you are MP-ing dry in between coats.  At least 15-20 minutes. I am an inpatient person, so this is hard for me. But, well worth it in the end!!


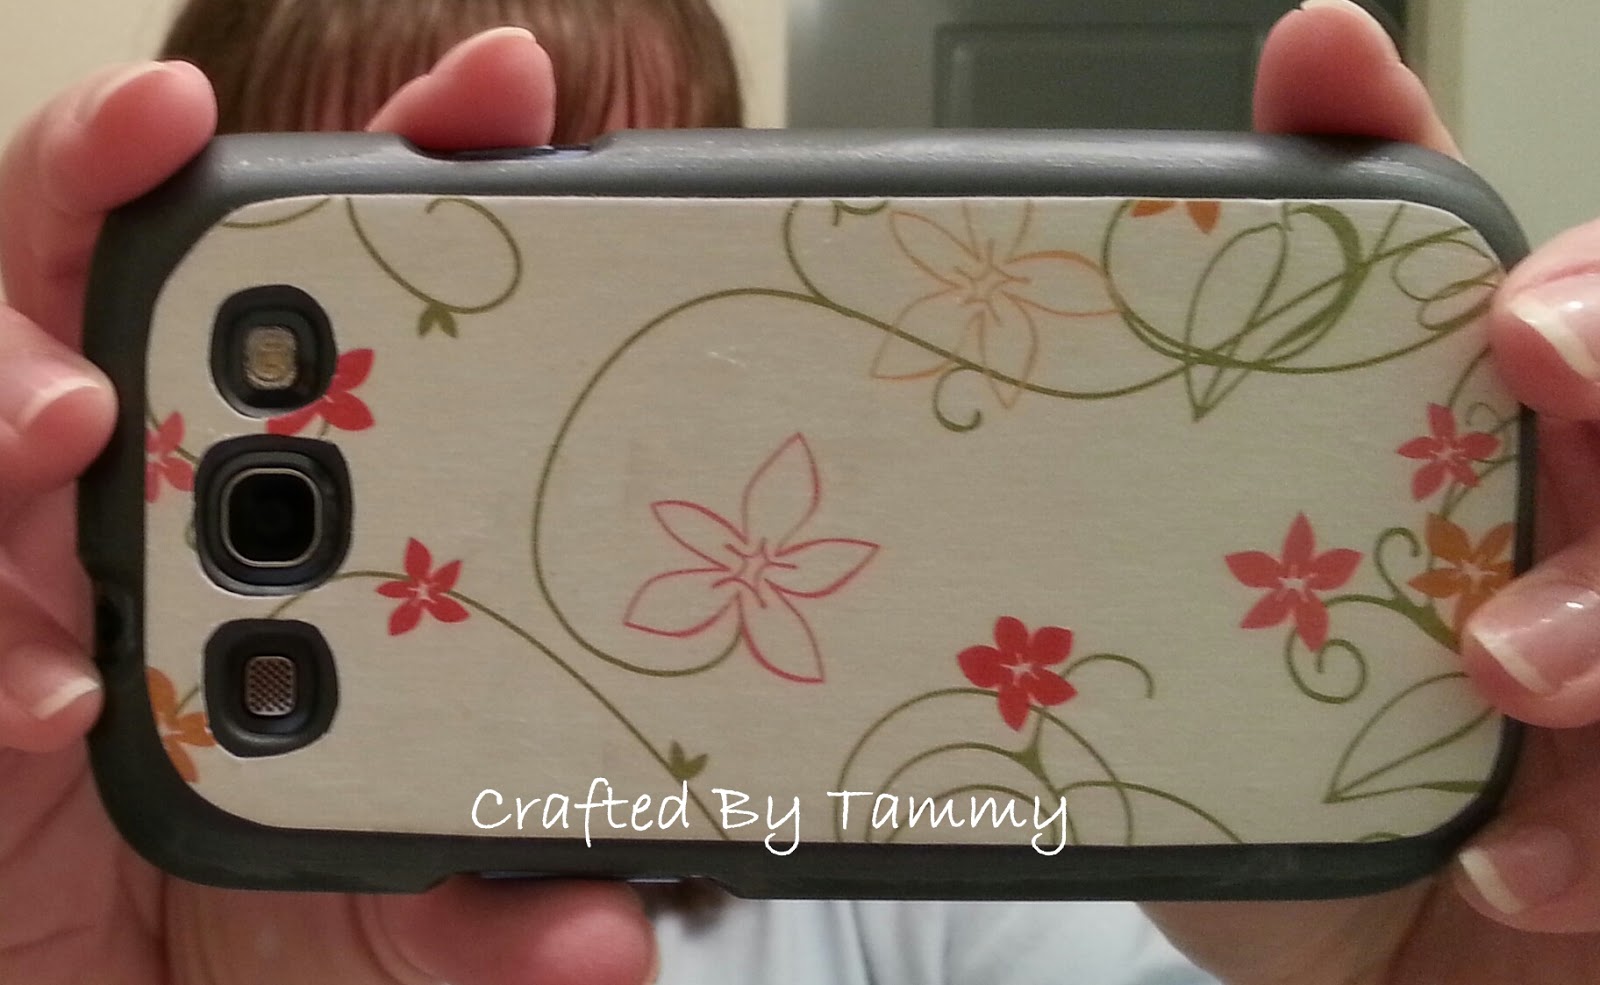
See, she is still pretty, just in a different, not shiny way. :) 

Note: if you look closely at the top of the paper, you can see the MP on the case. I just scraped it off with my fingernail. Not all at once. Over the space of a couple of days. 


Saturday, September 22, 2012

Panda Card

I had a request for two cards. She asked if I could do a back to school theme as they were for her assistant teachers in her classroom. She said the colors were red and black, and the mascot was a Panda.

Hmmm.....I couldn't come up with a back to school idea, so I just went with a panda. I searched the internet for some punch art...cause you know you make just about any animal with punches....put some of the examples I found together and came up with this little guy....


Then I got to work making my friend 2 cards to welcome her assistants to the classroom.


 (it is so hard to photograph the color red)


This one is my favorite of the two.


Stampin UP! Supplies
Punches - circle, oval, Owl Builder
Designer Paper - Night & Day
Craft Store Supplies
Cardstock - black, red, white
Ribbon

Tuesday, August 7, 2012

Baseball in a Picture Frame

Baseball in a picture frame??

Yep, you read that right!!


My aunt asked me to help her with a project her co-worker had told her about. 
I wasn't one to say "no" at a chance to get crafty.

So she came over and we got to work.  She took a box cutter and ran the blade thru the middle of the stitching on the ball.  Then she peeled back the leather to expose the inside of the ball.

(behind the ball in the package you can see what the ball looks like after it has been peeled)


We then printed out the saying on the computer.  We used a couple of different fonts and sizes so she could decide what size she wanted.  We cut and rounded the corners of some cardstock, then layered and glued those together.


We arranged the leather in a cross, and used glue dots to hold it down on the black cardstock.
Then glued the quote down.


Here is the finished project.


Everyone commits errors. . . 
but His sacrifice 
will bring you home.


Stampin UP! Supplies
Punches - corner rounder
Cardstock - Real Red, Ivory
Craft Store Supplies
Cardstock - black


Thank You Cards

I made these for a friend. She requested 6 Thank You cards. 

I challenged myself to make 6 different ones. I like how they turned out.

I have tried to make two different cards with this Raspberry Lemonade DSP, and have failed miserably both times.  This paper is just to "busy" for me I guess.  But I really like how these cards turned out.  The smaller cuts of paper work great for these layouts I think. 


The butterfly card has some shimmer dabbed on the card base.


These strips of paper were cut with my paper cutter.


A square punch was used on this one. I wished I had used a dimensional under the butterflies. Next time!


I cut circles of cardstock to glue behind the lace ribbon. I think these two are my favorite. 


A whole set of Thank You's. 


Stampin UP! Supplies
Stamps - Thank You Kindly
Punches - Lace Ribbon Border, square
Paper - Raspberry Lemonade DSP
Cardstock -  Melon Mambo, Rich Razzleberry
Embosslits - Beautiful Wings
Craft Store Supplies
Cardstock - white
Tools
Big Shot


Wednesday, July 18, 2012

Baby Shower Card - Converse Style

Sometimes I see a card, or scrapbook LO, or any project in general, and am just blown away by the creativeness of the person who made it. The original poster of this card got the idea for a Converse style sneaker card from a sketch. You can read her post here Converse Sneaker Card .

And here is my CASE (copy and share everything) of her card -

(I forgot to crop my picture)

There were no details on the original blog post, so I just winged it.  I laid the ruler on the card and moved it around until I got the angle "just right". I used the ruler for a guide to "stitch" with a white pen. My ribbon shoelaces didn't turn out the best. Practice makes perfect though, so I am going to make a few of these and keep them on hand for future showers or birthdays.


I bet a pink one with some bling or glitter would be adorable, don't you??


I used Stampin UP! punches and the star stamp came from a set that I can't remember the name of, sorry. The paper, letter stamps and ribbon was all bought locally. 


Monday, July 16, 2012

Jenga anyone?

(No, I have not been playing Jenga since my last post in umm, February. LOL)  


Keychains made from Jenga game pieces. Cool, huh?

Although, I am pretty sure you have seen them on Pinterest, or while surfing the web.  

I used various Stampin UP! papers and Mod Podge. The little hook thingys I found at Lowe's. 


   I used my Big Shot to cut out the butterflies and hearts. 

I brushed Mod Podge Matte on the block and on the back my paper piece. I laid the paper on the block and smoothed out the bubbles, wrinkles and the edges. I did this for 3 sides so that I could lay the block down to dry and not have to lay it on a wet side. I laid it down to dry on the dry side, the un-papered side. 
?? make sense ??

I let those dry for about 20 minutes then I applied another coat of MP Matte.  Let dry.  And do another coat.  So 3 coats of MP Matte.  Then I repeated that process with the MP Hard Coat. 

Then I used the same process on the un-papered side. 

* * * * *
I am not a patient person, lol.  This Mod Podge is trying my patience! haha I don't like waiting!  And you have to wait for it to dry.  If you don't, then it make your project too wet, and you get bubbles and wrinkles.  

* * * * *
Thanks for visiting my blog!
Live ~ Laugh ~ Love ~ Scrap ~ Create


Stampin UP! Supplies
Paper - Woodland Walk, Patterns Love, Lap of Luxury (i think they are all discontinued)
Embosslits - Beautiful Wings, Fashionable Hearts
Craft Store Supplies
Mod Podge - matte, hard
Tools
Big Shot
Extras
Jenga game
little hook thingys

Saturday, February 4, 2012

Sweet Card for a Sweet Girl


A friend of a friend has this sweet little girl. 

This sweet little girl is turning One! 

So I made a sweet little card for her.


I used my Cricut to cut the circle and the number one. The patterned paper I used has a little bit of shimmer to it on a couple of pieces.  I thought all of the patterned paper needed shimmer. So I spread the Stickles very thin. Hard to see but it's there. 

It's also on the Very Vanilla cardstock.  It wasn't planned that way.  But things happen. 

You know, like, touching Stickled patterned paper before it's dry.  Then touching the card.  Umm, yeah, it happens. I was tired and didn't want to make another card.

Hubby says I was cranky.  I don't know what would make him say that. 

But I wanted to get this card done. 

So I put some Stickles on a scrap piece of paper, then rubbed some of it off.  Then rubbed that scrap paper on the card.  I didn't want a lot on there.  Just a shimmer is all it needed. You should be able to see a little bit of it in the top picture, at the top of the card.


I like it when mistakes turn into something sweet. Don't you?


Stampin UP! Supplies
Marker - Melon Mambo 
Paper - Sending Love
Cardstock - Very Vanilla
Craft Store Supplies
Ribbon 
Stickles
Tools
Cricut
Big Shot, Lattice folder 


Pin It


Tuesday, January 17, 2012

Rough Drafts


A small feat, no doubt. But still got something accomplished tonight. Rough drafts! The first card I make is usually what I call the rough draft, 'cause I am bound to make changes. Alot of changes. 

2 rough drafts for 2 Valentines Day cards.
1 rough draft for a wedding card.
1 rough draft for a 60th birthday card.

I was a busy bee tonight, lol.  Not really happy with the papers for the birthday one, so there might be more changes on that one. We shall see!  Now time for some shut eye!

Pin It

Friday, January 13, 2012

I'm Lovin' It - Explosion Box

Explosion Box!!

I love my Explosion Box!  I found the instructions HERE at Glitter Adventure. That is a tea bag fold on top of the box. I learned about them HERE at Circle of Crafters

This Explosion Box is pictures of my daughter up to age 13. It's about time to make another one, as she turns 18 this summer! Oh, where did time go.....*sigh*


It's like a little scrapbook!


This was made with Bazzill cardstock, various stickers, vellum with sayings/quotes on it, and patterned paper. I bought all of this at the local scrapbook store, which has since closed (insert sad face), back in 2005. 

The pictures I used in the box are blurry because I do not, will not scrap an original picture. And this was before I had a digital camera, so all of these pictures were scans of the original ones.  

I made 2 more around this time also. My sister has one, it has her two boys in it, made with blues and greens. I also made my mom one. It is packed away with her stuff that I just can't go thru yet. Someday I will. 

I really love these little mini scrapbooks. I can't wait to make the next one! 


I am linking up to Tidymom's I'm Lovin' It Friday. 

I'm Lovin' It at TidyMom

What are you lovin' this week?


Saturday, January 7, 2012

Cupcake!!

What a great way to start 2012 right?

I made this back in May of 2011. I wanted to use the Cupcake Builder Punch in this layout. But could not get a color combo to "work". You know how some colors look great together but when you start putting your card (or scrapbook layout) together, It.Just.Does.Not.Work.

I tried everything. I was getting frustrated. Nothing was working. After almost 2 weeks, I was ready to pack it all up.

Then as I walked into Sunday School Class and there it was. The color combo that saved this card! Yellow. Black. White.  YAY!! My aunt had saved the day, haha.  She had on a dress with these colors. I confess, I couldn't wait to get home to try these colors.

So here it is, The Card That Almost Wasn't. . . . .


I used the Itty Bitty Background stamp set to make the background, under the ribbon. And used tissue paper dabbed on the black ink pad for the smaller background, under the cupcake. All edges are inked.


I got my inspiration from this card Stampin Pretty. I love her cards! Mary Fish is so talented!!


Stampin UP! Supplies
Ink - Craft Basic Black 
Stamps - Itty Bitty Backgrounds
Punch - Cupcake 
Craft Store Supplies
cardstock - black, white, yellow
Ribbon - white, black
Stickles
Tools
Crimper